Custom routes in Umbraco for better SEO

We all want lots of visitors on our sites, that's why we have to keep Google (and other search engines) happy when we are creating our site. To make our content more searchable we want to have the URL's to our pages as descriptive as possible. In this post I'll show you how to create custom routes in Umbraco that have the creation date and the name of the node in de URL (but you can use anything you want).
The setup

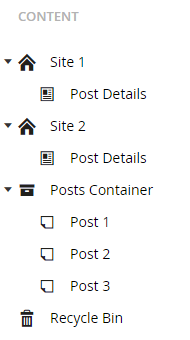
 For this example I have created multiple websites with different domains. For example the first site would have a domain site1.com and the second site's domain would be site2.com. On all these websites I want to be able to show my posts. I couldn't just create a posts page and add posts under that node because I would have to repeat this for my other site(s). That's why I have created a separate container under the root node which holds all my posts. This way the posts can be shared across all websites. For example Post 1 would be available on both site1.com/post/21-01-2017/Post-1 and on site2.com/post/21-01-2017/Post-1.
To achieve this we have to define a custom route in Umbraco, let's get started!
Defining the route
First of all, we need to tell our application which route will be used to display our page. Let's create a new static class "CustomRoutes".
public static class CustomRoutes
{
    public static void Configure()
    {
        RouteTable.Routes.MapUmbracoRoute(
        "PostRoute",
        "post/{date}/{name}",
        new
        {
            controller = "Post",
            action = "Index"
        }, new CustomRouteHandler());
    }
}
I've created one static method Configure to define our routes.
Here I have defined one route which will be used to display our posts using the following pattern: post/{date}/{name}. Which means our actual URL might look something like this: post/21-01-2017/My-post. Great, that's exactly what we want!
In addition we have to supply a RouteHandler for the defined route. This class is responsible for associating the correct node to the route. Let's create one.
Adding a custom routehandler
To create the routehandler, we have to create a new class which derives from UmbracoVirtualRouteHandler, and implement the FindContent method.
public class CustomRouteHandler : UmbracoVirtualNodeRouteHandler
{
    protected override IPublishedContent FindContent(RequestContext requestContext, UmbracoContext umbracoContext)
    {
        var umbracoHelper = new UmbracoHelper(umbracoContext);
        var home = GetHomeByHost(umbracoHelper, requestContext.HttpContext.Request.Url.Host);
        return home?.Children.FirstOrDefault(c => c.DocumentTypeAlias == "postDetail");
    }

    private IPublishedContent GetHomeByHost(UmbracoHelper umbracoHelper, string host)
    {
        foreach (var node in umbracoHelper.TypedContentAtRoot().Where(c => c.DocumentTypeAlias == "home").ToList())
        {
            var a = new Uri(node.UrlAbsolute());
            if (a.Host == host)
            {
                return node;
            }
        }

        return null;
    }
}
In the "FindContent" method we have to look for the PostDetail page. But since we have more than one site, we have to find the correct site first. I have written a simple function which gets the correct homepage based on the URL. When we have the correct homepage we can simply find the Details page in its children.
Wiring up
Now we have defined our route, but the application doesn't know about it yet. We'll need to add the following code to the UmbracoStarup.cs file inside the OnApplicationInitialized method:
public class UmbracoStartup : IApplicationEventHandler
{
    public void OnApplicationInitialized(UmbracoApplicationBase umbracoApplication, ApplicationContext applicationContext)
    {
        CustomRoutes.Configure();
    }

    ...
}
Creating our controller
Once we arrive in our controller we only have to get our post and then return our view. Of course you will probably implement some more logic here, but that is beyond the scope of this blogpost.
public class PostController : RenderMvcController
{
    public ActionResult Index(RenderModel model, string date, string name)
    {
        var post = GetPost(date, name);
        if (post == null)
            return HttpNotFound();

        return View("PostDetail", new PostViewModel(model, post));
    }

    private IPublishedContent GetPost(string date, string name)
    {
        var umbracoHelper = new UmbracoHelper(UmbracoContext);

        var container = umbracoHelper.TypedContentAtRoot().ToList().FirstOrDefault(c => c.DocumentTypeAlias == "container");
        if (container == null)
            return null;

        foreach (var child in container.Children)
        {
            if (child.Name.Slugify() == name && child.CreateDate.Date == date.UrlDateToDateTime())
                return child;
        }

        return null;
    }
}
As you can see in the GetPost method, I have used some extension methods to make my life a bit easier. For those of you who are interested, you can find them below. Additionally, I created a PostViewModel which keeps track of our PostDetail page and has a property for the post. We can use this viewmodel to display the required data in our view.
Note: If you are updating your existing site, make sure you keep your original routes and redirect them to the new ones using a 301 redirect. You don't want to make Google or other search engines angry.
Used extensions
public static class Extensions
{
    public static string AsUrlDate(this DateTime date)
    {
        return date.ToString("dd-MM-yyyy");
    }

    public static DateTime UrlDateToDateTime(this string date)
    {
        DateTime datetime;
        DateTime.TryParseExact(date, "dd-MM-yyyy", new DateTimeFormatInfo(), DateTimeStyles.None, out datetime);
        return datetime;
    }

    public static string RemoveAccent(this string txt)
    {
        byte[] bytes = System.Text.Encoding.GetEncoding("Cyrillic").GetBytes(txt);
        return System.Text.Encoding.ASCII.GetString(bytes);
    }

    public static string Slugify(this string phrase)
    {
        string str = phrase.RemoveAccent().ToLower();
        str = System.Text.RegularExpressions.Regex.Replace(str, @"[^a-z0-9\s-]", ""); // Remove all non valid chars
        str = System.Text.RegularExpressions.Regex.Replace(str, @"\s+", " ").Trim(); // Convert multiple spaces into one space
        str = System.Text.RegularExpressions.Regex.Replace(str, @"\s", "-"); // Replace spaces by dashes
        return str;
    }
}
These are pretty straight forward but in case you’re missing anything, let me know in the comment section.
That's it!
As you can see defining custom routes in Umbraco isn't as hard as it seems. Thanks for reading, and if you have any questions or suggestions please feel free to comment below.